How to Install a Router at Home
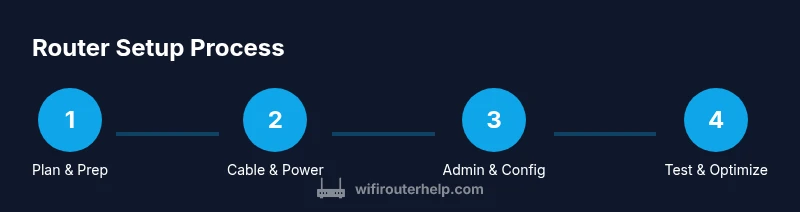
Learn how to install a router at home with a clear, practical workflow. Plan placement, choose the right device, connect cables, configure Wi‑Fi, and secure your network. This guide provides a complete setup, practical tips, and troubleshooting to ensure strong coverage in every room.

Installing a router at home is straightforward: connect the router to your modem with an Ethernet cable, power it on, and configure Wi‑Fi with a strong password. Plan placement for optimal coverage and secure your network with up-to-date security settings. This quick guide gives you a repeatable, step-by-step workflow to get online fast, safely, and reliably. According to WiFi Router Help, a thoughtful install reduces dead zones and simplifies future maintenance.
Why installing a router at home matters
According to WiFi Router Help, installing a router at home is foundational for reliable streaming, fast gaming, and secure remote work. A well-executed install provides even coverage, straightforward management, and stronger protection against intrusions. In this section we frame the purpose of the setup, explain the typical layouts (single-router vs. mesh), and outline the decisions you’ll face before you touch a cable. Think of this as a practical orientation: define coverage goals, identify potential interference sources (thick walls, metal appliances, large mirrors), and select a topology that fits your floor plan. With a clear objective, you can evaluate whether a single router suffices or if you’ll benefit from extenders or a mesh network. The result should be robust Wi‑Fi across the rooms you use most, with simple, memorable credentials for quick access.
Plan your network layout and router placement
A thoughtful placement plan maximizes signal reception while minimizing interference. Start by mapping your home and noting where you spend the most time online. Central locations near the middle tend to deliver more even coverage than a lone device in a corner. Avoid placing the router on the floor or behind large metal objects, appliances, or dense walls that degrade signals. Keep it away from cordless phones and microwaves, which can emit RF noise. For multi-story homes, a two-tier strategy often works best: a strong central router or a light mesh system to fill in distant rooms. Finally, plan cable routes: you’ll typically run one Ethernet cable from the modem to the router, plus any wired devices you want to support. A clear plan saves time during installation.
Choosing the right router for your home network
Select a router that aligns with your usage. For most households, a modern dual‑band or tri‑band device with WPA3 security provides a solid balance of performance and protection. Look for support for current Wi‑Fi standards (Wi‑Fi 6/6E), enough RAM and CPU power for the number of devices you own, and a track record of firmware updates. If you have many smart devices, 4K streaming, or a gaming rig, prioritize hardware capable of handling high concurrent connections. Features like MU‑MIMO, QoS for prioritizing traffic, and straightforward guest-network options can improve everyday experience. Remember: higher forward speed only helps if your devices can reliably use it; the goal is consistent coverage, not just peak bursts.
Understanding your modem and internet service
Before wiring the router, clarify how your home connects to the internet. Some households use a separate modem, while others rely on a gateway provided by the ISP. In most cases you’ll connect the router’s WAN/Internet port to the modem via Ethernet, then distribute the connection to devices. If you have a gateway, you may need to bridge it or disable its routing features to avoid double NAT, depending on your setup. The exact steps vary by provider and device, so consult your service guide before changing these settings. The aim is for the router to handle distribution and security while the modem provides the actual internet connection.
Preparing your workspace and safety considerations
Choose a stable, elevated location with good ventilation and minimal exposure to activity that could dislodge cables. A central shelf near the middle of the home often yields the best balance of distance and coverage. Keep cables neatly organized with labels to simplify future maintenance. Ensure adequate airflow around the router to prevent overheating under load. If you share outlets, use a surge-protected power strip to guard against power surges. Finally, plan for future upgrades by leaving some slack in the Ethernet runs and choosing a router capable of firmware updates for years to come.
Physical setup: placement, cables, and power
Unbox the router and set it aside until you’re ready to test. Connect the modem to the router’s Internet/WAN port with an Ethernet cable. Plug in power to both devices and power them on in the recommended order (modem first, then the router). Wait for the status lights to indicate normal operation. Position the router away from walls and large metal objects and ensure the cable runs are tidy. Confirm you have an active internet connection by testing a device once the router boots. If you encounter issues, reseat cables and retry booting one device at a time.
Accessing and configuring the router's admin interface
From a connected computer or phone, open a browser (or use the router’s app) and enter the default gateway address to reach the setup wizard. Typical addresses are 192.168.0.1 or 192.168.1.1, but some models use different values—check the label or manual. Log in with the default credentials and follow the setup wizard to configure WAN settings and your initial admin profile. Create a strong admin password separate from your Wi‑Fi password, enable essential security features, and set your preferred Wi‑Fi name (SSID) and password. Save changes and reboot if required.
Optimizing wireless performance and coverage
Once basic configuration is complete, fine-tune settings for best coverage. Use a wider channel width (80 MHz on 5 GHz) where available and reserve 2.4 GHz for legacy devices. If your router supports it, enable both bands with a unified SSID for seamless roam, or keep separate SSIDs for easier device management. Activate a guest network for visitors and apply parental controls if you need to manage access. Consider adding mesh extenders or a second node in large homes. Periodically check for interference from neighbors and adjust channels to preserve speed; test the performance in multiple rooms to confirm coverage.
Security, maintenance, and routine checks
Security starts with simple habits: change the default admin credentials, use a strong Wi‑Fi passphrase, and enable automatic firmware updates when possible. Disable features you won’t use, such as remote management, WPS, or UPnP, to minimize attack surfaces. Create a separate guest network with its own password and consider enabling parental controls if needed. Regularly verify connected devices and look for unusual activity. Maintain a clean, documented network profile (SSID, password, admin password) to simplify future changes and audits. The WiFi Router Help team emphasizes that a straightforward setup is easier to secure and maintain over time.
Authority sources and further reading
To support best practices, consult authoritative sources: https://www.fcc.gov/consumers/guides/home-network-security, https://www.cisa.gov/publication/security-tip-top-5, https://www.nist.gov/topics/cybersecurity. These resources provide guidance on securing home networks, configuring devices safely, and maintaining up-to-date software. Always verify guidance against your specific router model and ISP requirements. The information here aligns with these trusted references to help you install and secure your home network.
Final tips from WiFi Router Help
Based on our experience, planning placement, using strong credentials, and keeping firmware current are the most impactful steps. After setup, run a few speed tests in key rooms and adjust placement if needed. If you encounter trouble, revisit the admin panel to confirm settings or reset the router and start again. The WiFi Router Help team recommends documenting your network name, password, and admin password in a safe note for future reference.
Tools & Materials
- Broadband modem(Provides the internet connection; ensure it’s functioning with your plan.)
- Router (Wi‑Fi router)(Choose a model with current Wi‑Fi standards and security features.)
- Ethernet cable (Cat5e or better)(Connects modem to the router’s WAN/Internet port; use a new cable if possible.)
- Power outlet or surge protector(Provide stable power for both devices with protection against surges.)
- Computer or smartphone(Used to access the router’s admin interface and run the setup.)
- Optional: Mesh extenders or secondary satellite(For larger homes or complex layouts needing broader coverage.)
- Cable management supplies(Keep cables neat and labeled to simplify maintenance.)
Steps
Estimated time: 15-40 minutes
- 1
Power down and unplug existing devices
Power down your modem and any old router, then unplug them from power. This ensures safety and gives you a clean starting point. Prepare the space and cables you’ll use for the new setup.
Tip: Wait 30 seconds after unplugging to discharge any residual charge before handling cables. - 2
Connect the modem to the router’s WAN port
Insert one end of the Ethernet cable into the modem’s Ethernet port and the other end into the router’s Internet/ WAN port. This creates the data path from your ISP to your home network.
Tip: Use a fresh Ethernet cable to minimize interference and ensure a stable link. - 3
Power on the modem and the router
Plug the modem in first and wait for it to boot fully. Then power on the router and wait for its status lights to indicate a stable connection. This ensures the devices boot in the correct order.
Tip: If lights are abnormal, reseat cables and reboot one device at a time. - 4
Access the admin interface
From a connected computer or phone, open a browser or the router’s app and enter the default gateway address. Log in with the default credentials to start the setup wizard.
Tip: Check the device label or manual for the exact IP if 192.168.0.1/1.1 doesn’t work. - 5
Run the setup wizard and set WAN type
Follow the guided wizard to select your WAN type (DHCP, PPPoE, or static). This step configures how your router talks to the internet and creates the initial admin profile.
Tip: If you’re unsure about WAN type, consult your ISP onboarding email or support before proceeding. - 6
Set Wi‑Fi name (SSID) and password
Choose a memorable, unique SSID and a strong password. For easier recall, use a passphrase rather than a random string. Apply settings for both 2.4 GHz and 5 GHz bands.
Tip: Use WPA2‑PSK or WPA3‑Personal; avoid deprecated protocols like WEP. - 7
Choose security settings and guest network
Enable the recommended security mode (WPA2/WPA3) and set up a guest network if desired. Disable remote management unless you explicitly need it for trusted access.
Tip: Guest networks isolate visitors from your main devices, increasing security. - 8
Update firmware and save configuration
Check for firmware updates and apply them. Save the configuration and reboot if required to ensure changes take effect.
Tip: Enable automatic updates if your device supports it for ongoing protection. - 9
Test connectivity and finalize placement
Connect multiple devices to test speed and coverage in key rooms. If some areas are weak, adjust placement or add extenders as needed.
Tip: Run speed tests in a living room, bedroom, and home office to verify consistent coverage.
People Also Ask
Do I need a modem to install a router?
Yes, a modem (or gateway) is typically required to connect to your ISP. If you have a gateway, you may need to bridge it or disable its routing to avoid double NAT when using a separate router.
Usually you need a modem; you might bridge a gateway if needed.
Where is the best place to put a router?
Aim for a central, elevated position away from thick walls and metal objects. A shelf near the center of the home often yields the best overall coverage.
Place it high and central for best coverage.
How long does setup take?
Most setups take about 15 to 40 minutes, depending on your home layout and whether you add extenders for dead zones.
Typically 15 to 40 minutes with a prepared workspace.
Should I use a guest network?
Yes. A guest network keeps visitors on a separate path from your main devices, protecting privacy and security while still providing internet access.
Yes—use a guest network to separate visitors from your main devices.
How do I change the default admin password?
Log into the admin panel, navigate to security or admin settings, and replace the default password with a strong, unique one. Consider storing it in a password manager.
Change the default admin password to a strong, unique one.
What if devices won't connect after setup?
First, reboot the router and affected devices. Verify the firmware is current, and confirm you’re using the correct SSID and password. If issues persist, reset the router and re-run setup.
Restart devices, verify settings, and re-run setup if needed.
Watch Video
What to Remember
- Plan placement before wiring to maximize coverage
- Use strong, unique credentials for Wi‑Fi and admin access
- Keep firmware up to date for security and reliability
- Test coverage in multiple rooms and adjust as needed
- Enable guest networks to protect main devices