How to Connect a Router Without Cable
Learn how to connect a router without Ethernet, using wireless setup, WPS, or a mobile hotspot. This step-by-step guide helps homeowners securely configure WAN, set up SSID, and test connectivity without a cable.

Goal: connect a router without a cable by starting on its wireless network, then configuring settings via the admin page. You’ll need a device with Wi‑Fi, the router’s default SSID and password, and a browser to access the router’s address. After connecting, set up your internet WAN type, security, and network name so all devices can join safely.
Why you might connect a router without cable
Connecting a router without a cable is common when Ethernet drops are unavailable, when you’re replacing a legacy device, or when you want to test guest access quickly. This guide focuses on how to connect a router without cable using wireless setup, WPS when supported, or a mobile hotspot as a temporary bridge. The objective is to get you up and running with a secure wireless network, then refine settings like WAN type, SSID, and password. While a physical Ethernet link often makes configuration feel faster, wireless setup is perfectly viable for most consumer routers and keeps the setup process tidy and straightforward. The WiFi Router Help team emphasizes following official steps to avoid misconfigurations, especially when adjusting security and access controls.
As you proceed, keep in mind that wireless setup assumes you have a working broadband modem and an active internet plan. If the internet is temporarily down, you can still complete the basic local network configuration and prepare the router for when the connection is restored.
Getting ready: what you need
Before you begin, gather the items and confirm the basics. You need a device with Wi-Fi (phone, tablet, or laptop), the router you plan to configure, and the router’s label with the default SSID and password. Make sure the router is powered on and within range of your device. If you have a mobile data plan, you can temporarily turn your phone into a personal hotspot to access the admin interface if your home network is temporarily offline. Keep notes of any credentials you plan to change and write down the exact network name you want to use. For privacy and security, reset to factory defaults if you’ve previously configured the router and can’t recall the login details.
Also verify the router model supports wireless setup without a cable; some models offer companion apps that simplify the process.
Wireless setup from a device
To begin, ensure your computer or phone is connected to the router’s default wireless network. Open a browser and enter the router’s default IP address (commonly 192.168.0.1 or 192.168.1.1) or the URL shown on the device label. Log in with the default credentials and navigate to the WAN/Internet section. Choose the correct connection type (DHCP/PPPoE/VPN as appropriate for your ISP) and configure a new SSID and a strong password for your wireless network. Save changes and allow the router to reboot if prompted. After reboot, reconnect your device to the newly named network to verify internet access.
If you cannot access the admin page, recheck the IP address on the router label, or consult the manual. Some routers support a one-tap reset that returns you to factory defaults and makes the screen prompts clearer on your next attempt.
Alternative: WPS and companion apps
Many modern routers support WPS (Wi‑Fi Protected Setup) to connect devices quickly to the new network. If your router and device both support WPS, press the WPS button on the router and then on your device within a short window to establish a connection. WPS is convenient but has known security vulnerabilities, so disable WPS after you’ve completed setup. Some vendors offer mobile apps that guide the configuration step-by-step; apps can auto-detect the router’s network and walk you through WAN settings, security, and firmware checks without needing a cable.
When using apps or WPS, ensure you download only official, trusted versions from the vendor and avoid sharing sensitive credentials through third-party tools.
Internet source options when no Ethernet
If no Ethernet port is available or you must avoid cables, you can still complete most setup tasks using a temporary smartphone hotspot or a neighbor’s guest network (with permission). After you connect to the router’s wireless network, you can configure WAN and Wi‑Fi settings to match your ISP. If the router requires internet access during setup, you can briefly enable a hotspot, finish WAN configuration, then disable the hotspot and connect the router to your primary internet source once available. This method preserves a cable-free workflow while ensuring your router is properly optimized.
Security basics after wireless setup
Once the router is configured, immediately change the default admin password to a strong, unique one. Create a separate, strong Wi‑Fi password and consider enabling WPA3 or at least WPA2 security. Disable remote management unless you need it, and keep the router firmware up to date to protect against newly discovered vulnerabilities. Regularly review connected devices in the admin interface and remove unknown clients. A well-done wireless setup balances accessibility with strong protections.
Troubleshooting common issues during wireless setup
If the router’s admin page isn’t reachable over wireless, verify you are connected to the correct SSID and that you’re using the right IP address. Some routers use 192.168.0.1, while others use 192.168.1.1 or a vendor-specific URL. If you cannot access the page, perform a safe reset and try again. If the internet won’t come up after WAN configuration, double-check your ISP settings (DHCP vs PPPoE) and ensure MAC cloning or PPPoE credentials are entered correctly. Keep a note of the bridge or router mode if your network topology includes a separate modem.
For performance, place the router away from thick walls and electronics that cause interference, and select a less crowded Wi‑Fi channel. If all else fails, consult the vendor’s support resources.
Quick reference: optimizing performance without wires
To maximize performance without copper cables, position the router centrally in your home, away from metal appliances and concrete walls. Use a single, strong SSID for your primary network, and enable QoS to prioritize video calls or gaming if needed. Consider a mesh setup if you have multiple floors or large spaces. Regular firmware updates help maintain security and performance, and keeping a clean guest network reduces risk while preserving bandwidth for primary devices.
Tools & Materials
- A device with Wi‑Fi (phone, tablet, or laptop)(Ensure it can connect to 2.4 GHz or 5 GHz networks and has a browser)
- Router with default credentials(Check the label on the bottom or back for SSID and password)
- Power adapter and a stable power source(Keep the router plugged in during setup)
- Optional: companion router app or WPS button(Some models offer simplified setup via app or WPS)
- Notepad or digital dongle(Record credentials and network names for future reference)
- Temporary internet source (optional)(Smartphone hotspot or neighbor guest network for initial access if needed)
Steps
Estimated time: 20-40 minutes
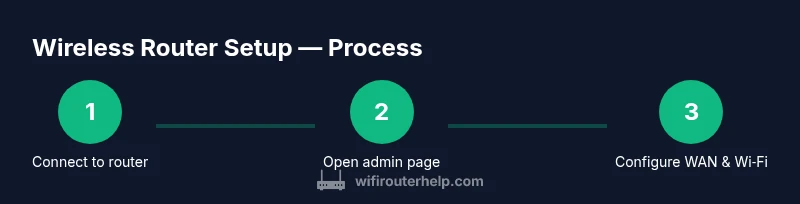
- 1
Power on and locate the router’s wireless network
Confirm the router is powered on and within range. Look for the default SSID on the label and ensure your device can see the network. This initial connection is critical because all subsequent configuration happens over this wireless link.
Tip: If you can’t find the SSID, check the bottom label or the quick start guide for the exact network name. - 2
Connect to the router’s default wireless network
On your device, join the router’s Wi‑Fi network using the password shown on the device label. This creates the bridge between your device and the router for admin access.
Tip: Use 2.4 GHz if your device has trouble with 5 GHz during initial setup. - 3
Open the router admin page
Open a browser and enter the router’s IP address (common values are 192.168.0.1 or 192.168.1.1). Log in with the default username and password from the label or manual. If prompted, accept the security certificate warning.
Tip: If the IP doesn’t load, try the URL in the manual or reset the device and retry. - 4
Configure WAN/Internet and wireless
In the admin panel, select the correct WAN/Internet type (DHCP, PPPoE, or static IP as provided by your ISP). Create a new SSID, set a strong password, and choose a security mode (WPA3 if available).
Tip: Document the WAN settings in case you need to reconfigure later. - 5
Secure the router and test connectivity
Change the admin password, disable remote management, and enable automatic firmware updates if available. Disconnect from the old network and reconnect to the new one; test internet access by loading a page.
Tip: Keep firmware up to date to protect against vulnerabilities. - 6
Finalize and optimize
Recheck connected devices, enable guest network if needed, and adjust channel and transmit power if interference occurs. Consider enabling QoS for critical devices if performance matters.
Tip: Run a quick bandwidth test to confirm speeds align with your plan.
People Also Ask
Do I need a cable to set up a router?
Not always. Many routers support wireless setup or companion apps. If wireless setup fails, a temporary Ethernet connection may be required.
You may not need a cable; many routers can be set up wirelessly, but some models require a temporary Ethernet link.
How do I access the router admin page without a cable?
Connect to the router’s Wi‑Fi network, then enter the default IP address (like 192.168.0.1 or 192.168.1.1) in a browser. If that IP doesn't work, check the router label or manual.
Connect to the router's Wi‑Fi and type the default IP into your browser.
What if I can't find the default SSID or password?
Look on the router's label, often on the bottom. If it's changed, perform a factory reset or use the mobile app to view settings.
Check the router label or app to recover or reset credentials.
Is WPS a safe method for initial setup?
WPS is convenient but has vulnerabilities. Use it temporarily and disable after setup.
WPS is convenient but has security risks; disable after setup.
How can I improve wireless performance after setup?
Center the router, minimize interference, update firmware, and consider changing channels or enabling QoS for priority devices.
Center the router, avoid interference, and keep firmware updated.
Do I need an internet connection to complete setup?
No, you can configure local network settings first and connect to the internet later when available.
No internet is needed for basic setup; you can configure locally first.
Watch Video
What to Remember
- Connect wirelessly to begin setup without a cable
- Access and configure the router admin page securely
- Secure the network and verify connectivity after setup