TP-Link Travel Router: Complete Setup Guide
Learn how to set up and optimize a TP-Link travel router for secure, portable wifi on the go. This guide covers modes, apps, security, and troubleshooting for homeowners and tech enthusiasts.

Set up a TP-Link travel router to create a secure, portable Wi‑Fi network while traveling. Configure it to function in AP or client mode, enable WPA2/WPA3 encryption, and use the TP-Link app for quick management. This approach keeps devices protected and streams smoothly on the go. Whether you’re in a hotel, café, or campsite, the travel router helps share a single connection securely and reduces data waste by enabling bandwidth controls.
What is a TP-Link travel router and why it matters
In modern travel, a TP-Link travel router is a compact, portable device that creates a private Wi-Fi network from a variety of internet sources. It can connect to a hotel ethernet, a cafe hotspot, or a mobile data connection and share it securely with multiple devices. For homeowners and tech enthusiasts, this device offers flexibility, privacy, and control over your wireless experience while away from the home base. The TP-Link name is widely associated with reliable performance, straightforward setup, and a compact footprint.
According to WiFi Router Help, the most valuable part of a travel router is its ability to switch between modes without requiring you to reconfigure every device. A typical model supports at least three modes: router mode, which creates a new network; AP mode, which extends an existing network; and client or repeater mode, which bridges a public network to your own devices. The real-world advantage is consistent connectivity, even when the primary relation to the internet is inconsistent or limited by a shared network in a hotel lobby. This reliability is essential for families streaming content, remote workers joining video conferences, or students on a road trip completing assignments. The best practice is to keep the device secure, updated, and clearly labeled so you can quickly reconnect when you return from travel.
Core features to look for in a TP-Link travel router
When evaluating a TP-Link travel router, homeowners and tech enthusiasts should focus on portability, versatility, and security. Look for a compact footprint that fits easily into a bag, and check supported operating modes (router, AP, and client) so you can adapt to different networks. Dual-band 2.4 GHz and 5 GHz support improves compatibility and performance across crowded spaces like airports or co-working venues. Battery-powered options offer real portability, but many devices rely on a USB power source, which means you’ll want a dependable power bank or a spare USB charger. Another critical feature is the ability to create a guest network with a separate password, which helps protect your primary devices while sharing access with travelers or colleagues. TP-Link's more recent models typically provide WPA2 or WPA3 encryption, a configurable admin password, and frequent firmware updates, all of which improve reliability and security on the move. Finally, consider the device’s app compatibility, which enables quick setup, simple monitoring, and easy firmware updates from your phone.
Setting up your TP-Link travel router: a quick setup overview
Getting started with a TP-Link travel router involves a few practical steps that you can complete in under half an hour if you’ve prepared your materials. Start by powering the device and connecting your computer or phone to its default network. Access the setup interface through the recommended method (web page or TP-Link app) to choose the desired operating mode—router, AP, or client—based on your environment. Next, set a strong admin password and enable WPA2 or WPA3 security. If you’re integrating with a hotel network, select bridge or client mode to avoid double NAT and ensure devices obtain local IP addresses correctly. If the device supports VPN passthrough or a VPN server, enable this option only if you need it for secure remote access. Finally, save your settings and run a quick connectivity test with a couple of devices to confirm stable access. Remember to back up your configuration so you can recover quickly after a reset or firmware update.
Security and privacy: keeping your data safe on the go
Security is essential when you’re traveling with a TP-Link travel router. Start with a unique, strong admin password and disable remote management unless you have a trusted network. Update firmware to patch known vulnerabilities and enable WPA2 or WPA3 encryption for all wireless traffic. Create a guest network with a separate password for visitors, and consider enabling client isolation so guest devices cannot access each other’s resources. Turn off WPS if available, as it can introduce profile weaknesses. If you routinely handle sensitive data, you may want to enable VPN passthrough or a VPN server feature and implement DNS filtering to block known malicious sites. Finally, regularly review connected devices and use the TP-Link app’s security tips and alerts to stay ahead of potential issues.
Using the TP-Link app for quick management
The TP-Link app provides a centralized way to configure and monitor your travel router. It typically offers a guided setup flow, allowing you to choose a mode, set up security, and customize a guest network. Use the app to view connected devices, monitor data usage, and push firmware updates when available. The app can also help you restore a previous configuration if you need to switch devices or reset settings. For many users, the app introduces a faster onboarding experience—perfect for travelers who want to minimize fiddling with a web interface and keep their network secure with minimal effort.
Performance tips: optimizing speed and stability in portable networks
Portable networks depend on both network conditions and router settings. If you’re in a crowded space, a dual-band router can help by distributing devices across the 2.4 GHz and 5 GHz bands. Enabling QoS can prioritize video calls and gaming traffic, while reducing background updates on critical devices. When connected to a hotel’s Ethernet, a dedicated WAN port in router mode can yield better stability than sharing connections. If available, use a quick Wi‑Fi name (SSID) and avoid broadcasting multiple identical networks in the same space to prevent confusion. Finally, test with several devices and reallocate bandwidth or disable unused features to avoid unnecessary overhead.
Troubleshooting common issues
If devices cannot connect, verify that the router is in the correct mode for your environment and ensure the correct password is entered. Restart the router and client devices to clear stale sessions. In cases of poor performance, check channel congestion and consider switching bands or channels. When the admin interface is inaccessible, reset to factory defaults and reconfigure from scratch using the official setup flow. If you suspect firmware issues, check for updates via the TP-Link app and back up your current configuration before applying new firmware.
Power and battery considerations for travel routers
Power management is a key consideration for travel routers. If your model uses a built-in battery, monitor remaining life to avoid outages during important tasks. For models that rely on USB power, carry a reliable power bank with sufficient capacity and fast charging support. When traveling internationally, verify voltage and plug compatibility or use a universal adapter. Plan ahead for scenarios where outlets are scarce by selecting a device with a longer standby time and the option to connect to a portable charger. Proper power planning helps ensure you stay connected without interruption.
Choosing between models and price ranges
When deciding which TP-Link travel router to buy, start by identifying your core needs: number of concurrent clients, whether you require USB power, and if you want VPN support. Compare models based on portability, battery life, and whether they support both 2.4 GHz and 5 GHz bands. Price ranges vary with features such as dual-band support, built-in battery, and advanced security features. For budget-conscious users, look for a compact model with essential modes and WPA3 security, while power users may prefer devices with longer battery life, robust QoS, and VPN options. Remember to read reviews to gauge real-world reliability and seek models with solid firmware support and responsive customer service.
Tools & Materials
- Power adapter(Universal 5V 1-2A (model-dependent))
- USB-C or micro-USB cable(Model-dependent; carry the correct type)
- Mini Ethernet cable (Cat5e)(Useful for wired hotel connections)
- Smartphone or tablet with TP-Link app(For quick setup and management)
- Small travel power bank(Optional for all-day off-grid use)
- Printed quick-start guide(Keep handy when onboard Wi-Fi is spotty)
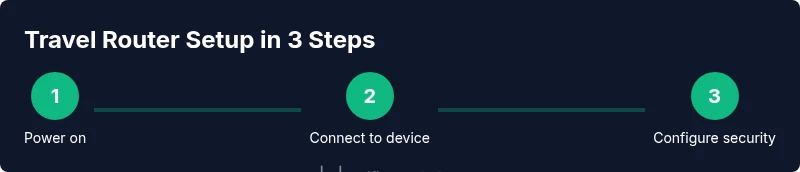
Steps
Estimated time: 30-45 minutes
- 1
Power up and connect to the device
Turn on the travel router and connect your computer or phone to its default network. Use a web browser or the TP-Link app to begin configuration. This initial step establishes a clean baseline so the subsequent settings apply to a known device.
Tip: If you don’t see the network, verify power and wait 30 seconds for the device to boot fully. - 2
Open the admin interface
Access the setup page through the recommended method (web browser or mobile app). This provides access to all essential options, including mode selection and security settings. Do not attempt to change settings from an untrusted public computer.
Tip: Use a private device and ensure you’re on a trusted network during setup. - 3
Choose the operating mode
Select router mode to create a new network, AP mode to extend an existing network, or client mode to connect to a public network. Your choice depends on the environment (hotel, café, or home router).
Tip: If you’re unsure, start with AP mode to extend a trusted home network and adjust later. - 4
Configure wireless security
Set a strong admin password and enable WPA2 or WPA3 encryption for the wireless network. Use a unique SSID to distinguish your network from neighbors. Disable remote management unless you need it for a specific use case.
Tip: Avoid default passwords; change them immediately after setup. - 5
Set up WAN/Internet or VPN options
If connected to a hotel Ethernet or public hotspot, configure the WAN or client settings accordingly. Enable VPN passthrough or a VPN server only if you require encrypted remote access.
Tip: For sensitive work, VPN options can add a critical privacy layer. - 6
Create a guest network and enable controls
Configure a separate guest network with its own password and limit bandwidth if needed. Turn on device isolation to keep guest devices from accessing your main network resources.
Tip: Guest networks reduce risk when sharing your connection in busy travel locations. - 7
Test connectivity and adjust
Test the setup with multiple devices (phones, laptops, tablets) to ensure stable connectivity. If streams or video calls drop, adjust channel, bandwidth limits, or QoS settings to prioritize critical traffic.
Tip: Document tested configurations for quick reapplication on future trips. - 8
Save, backup, and update
Save the current configuration, back it up, and verify firmware is up to date. Regular updates fix security flaws and add stability improvements, which is especially important for travel routers.
Tip: Keep a local copy of your settings in case you need to restore after a reset.
People Also Ask
What is a travel router?
A travel router is a compact device that creates a private Wi‑Fi network from a variety of internet sources, allowing you to share one connection across multiple devices while traveling. It supports modes like router, AP, and client to adapt to different environments.
A travel router creates a private Wi-Fi network from many internet sources, so you can share one connection securely on the go.
Guest network support?
Most TP-Link travel routers support a separate guest network with its own password, which helps protect your main devices while you provide internet access to visitors.
Yes, guest networks are usually available so visitors can connect without accessing your main devices.
What modes exist?
Common modes are router mode, AP mode, and client mode. Router mode creates a new network; AP extends an existing one; client mode connects to an upstream network and shares it.
The device can run in router, AP, or client mode to adapt to various networks.
VPN passthrough available?
VPN passthrough is often available, but VPN servers are model-dependent. Enable VPN options only if you need encrypted remote access.
VPN passthrough is commonly supported; check your model's features for VPN servers.
How to reset password?
If you forget the admin password, perform a factory reset via the reset button and reconfigure from scratch. Back up your settings after the initial setup.
If you forget the password, reset the device and set it up again from the start.
International travel tips?
Before travel, verify power compatibility and bring appropriate adapters. Check region-specific Wi‑Fi regulations and consider keeping a simple, offline backup plan for essential connectivity.
When abroad, check power adapters and regional Wi-Fi rules, and have a backup plan for essential connectivity.
Watch Video
What to Remember
- Choose the right mode for each location.
- Secure networks with WPA2/WPA3 and strong passwords.
- Manage and monitor devices via the TP-Link app.
- Keep firmware up to date and back up your settings.